


Apache has made it very easy to have multiple websites or web applications running on the same physical server, and access each using a custom domain name. This is known as virtual hosting, and each virtual host can be mapped to a different subdirectory of the server.
1. What are VirtualHosts?
The term ‘Virtual Host’ refers to the practice of running more than one website (such as company1.example.com and company2.example.com) on a single machine. Virtual hosts can be “IP-based”, meaning that you have a different IP address for every website, or “name-based”, meaning that you have multiple names running on each IP address
In this tutorial, I am going to demonstrate how you can set up and configure virtual hosts for WordPress websites with XAMPP running on Windows 10.
2. Enable loading of VirtualHosts Conf
Firstly, let us verify that the loading of Virtual Host conf is enabled in Apache via httpd.conf. Though this should be enabled by default but just for the sake of completeness and to avoid any potential misconfiguration on your host it is worth checking it before we start.
Open ‘httpd-.conf’ file located in XAMPP installation folder (\xampp\apache\conf\ httpd-.conf) in any text editor and search for ‘virtual hosts’. Now un-comment (enable) the following line by removing hash, if it is not already un-commented.
# Virtual hosts
Include conf/extra/httpd-vhosts.conf


3. Create your project directories
Open the XAMPP root folder and navigate to the sub-directory ‘htdocs’ (XAMPP\htdocs). For example, in my case, the path to my htdocs is ‘D:\DEV-WORKSPACE\XAMPP\htdocs’
Here I created two empty sub-directories named ‘website1’ and ‘website2’


Additionally, if you wish you can place some test files in these directories as well to verify your setup later.
You can create a simple test file with just a few lines like below. Save it with ‘.php’ extension inside your project directories created above.
<html>
	<head>
		<title>PHP Test for Website 1</title>
	</head>
		<body> <?php echo '<p>Hello World! This is Website 1</p>'; ?>  </body>
</html>


4. Edit VirtualHosts conf file
Navigate to ‘\xampp\apache\conf\extra’ or wherever your XAMPP files are located. In my case, my XAMPP root directory are located in drive D as shown below :

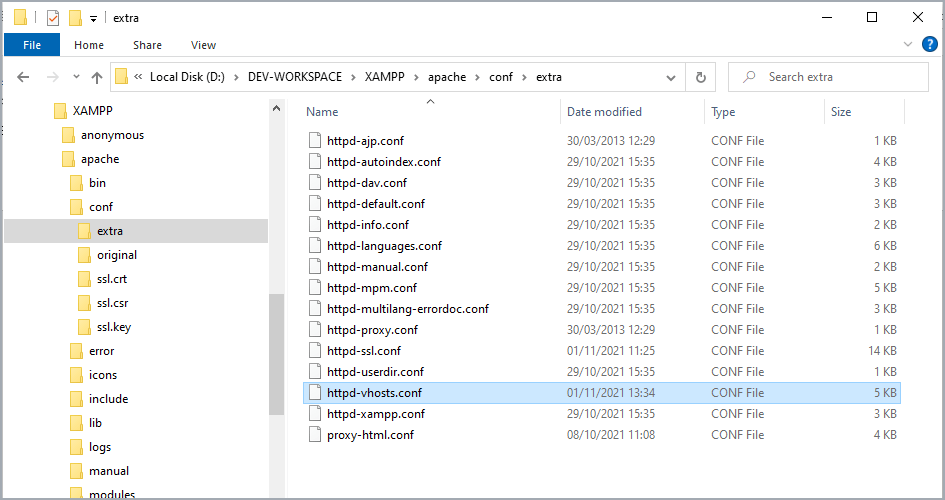
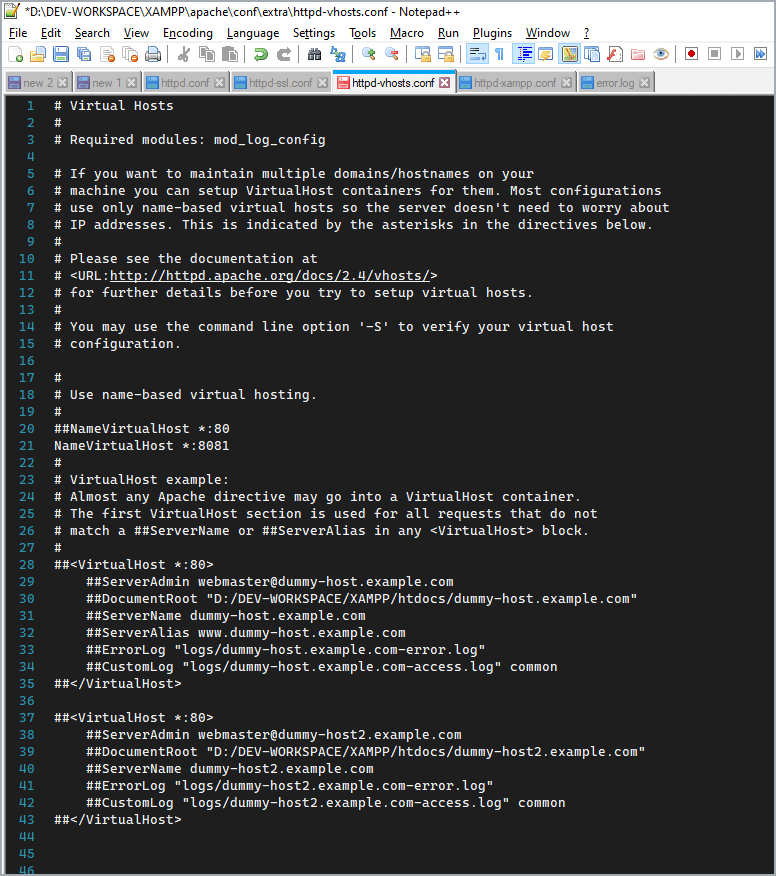
Open httpd-vhosts.conf file located in xampp installation folder (e.g C:\xampp\apache\conf\extra\httpd-vhosts.conf) in notepad or other text editor. The typical file may look like this –

5. Analyze Default VirtualHosts conf
5.1. ‘NameVirtualHost’ directive and port
As you can see, I have enabled this directive and assigned a custom port number which is 8081 (which in my case is the same as my Apache HTTP Listen port) instead of the default port 80 as per my custom configuration.
In your case, if you are using some custom port number already then you can keep using your port number, or else if you want to use default port 80 then by all means keep that.
Although more complex configurations are possible using multiple port numbers, multiple IP addresses, multiple listen ports, or even a hybrid configuration utilizing IP-based and name-based virtual hosts but for the sake of this demo article, we are going to keep it simple enough as per current need.
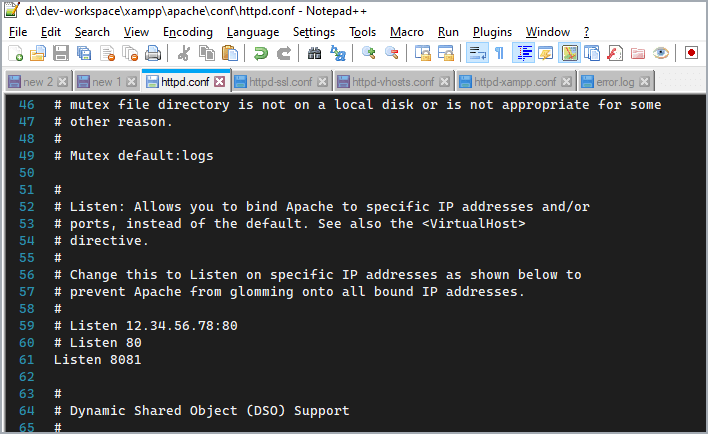
So for now it’s best to keep the same port number whatever you have assigned to Apache ‘Listen’ port in your ‘httpd.conf’ as shown below at line 61.

6. Create your new VirtualHosts
Typically, the way Apache Virtual Host resolution works is by comparing/parsing the IP addresses/hostnames against the listed virtual hosts and also comparing ServerName, ServerAlias, etc until it is satisfied with its absolute resolution.
6.1 Default or fallback VirtualHosts
When a request arrives, the server will first check if it is using an IP address that matches the NameVirtualHost. If it is, then it will look at each <VirtualHost> section with a matching IP address and try to find one where the ServerName or ServerAlias matches the requested hostname. If it finds one, then it uses the configuration for that server. If no matching virtual host is found, then the first listed virtual host that matches the IP address will be used. Hence the first listed virtual host is the default virtual host and that is why its good practice to have one.
6.2. Creating Default VirtualHosts
Let us start by creating the default Virtual Hosts. The easiest way is to re-use the demo virtual host configurations already supplied by Apache in ‘httpd-vhosts.conf’. So let us copy these and tweak our way through to put our new virtual hosts in place.
Here is one of the already supplied or demo snippets inside the ‘httpd-vhosts.conf’ :
##<VirtualHost *:80>
    ##ServerAdmin webmaster@dummy-host.example.com
    ##DocumentRoot "D:/DEV-WORKSPACE/XAMPP/htdocs/dummy-host.example.com"
    ##ServerName dummy-host.example.com
    ##ServerAlias www.dummy-host.example.com
    ##ErrorLog "logs/dummy-host.example.com-error.log"
    ##CustomLog "logs/dummy-host.example.com-access.log" common
##</VirtualHost>
After removing all the ‘#’ from all lines to un-comment and also stripping out the parts which we don’t require and we get our first version of our default Virtual Hosts configuration as below:
## FALLBACK VIRTUAL HOST CONFIG FOR UNMATCHED HTTP/S REQUESTS
<VirtualHost *:8081>
 DocumentRoot "D:/DEV-WORKSPACE/XAMPP/htdocs"
 ServerName localhost
</VirtualHost>
Since we may not need this fallback block very often, we keep it very minimalistic by defining only the port, our main server’s document root and the default server name. That is all! Just simply copy this block into your virtual host conf file.
6.3. Creating Multiple Custom VirtualHosts
Now, to add more virtual hosts, simply duplicate the Apache supplied sample virtual host block and modify the port number, DocumentRoot and ServerName directives as per our requirements as we did for the Default Virtual Host above.
So let us create say two new virtual hosts for 2 websites ‘website1’ and ‘website2’ with document root folders located ‘/xampp/htdocs/website1/’ and ‘/xampp/htdocs/website2/’ respectively.
To accommodate the above requirement, we will be creating 4 blocks which are 2 blocks per project or website. So each project/website would be defined via 2 blocks, one block for HTTP and other blocks for HTTPS (SSL)
VirtualHosts Config for PROJECT 1 – website1
## VIRTUAL HOST HTTP CONFIG FOR PROJECT 1 - website1 http
<VirtualHost website1:8081>
    ServerAdmin webmaster@website1.com
    DocumentRoot "D:/DEV-WORKSPACE/XAMPP/htdocs/website1"
    ServerName website1
	ServerAlias www.website1
    ErrorLog "logs/website1-error.log"
    CustomLog "logs/website1-access.log" common
	<Directory "D:/DEV-WORKSPACE/XAMPP/htdocs/website1">
		AllowOverride All
		Order allow,deny
		Allow from all
	</Directory>
</VirtualHost>


##VIRTUAL HOST HTTPS CONFIG FOR PROJECT 1 - website1 https
<VirtualHost website1:8082>
    ServerAdmin webmaster@website1.com
    DocumentRoot "D:/DEV-WORKSPACE/XAMPP/htdocs/website1"
    ServerName website1
	ServerAlias www.website1
	SSLEngine On
	SSLCertificateFile "D:/DEV-WORKSPACE/XAMPP/apache/conf/ssl.crt/server.crt"
	SSLCertificateKeyFile "D:/DEV-WORKSPACE/XAMPP/apache/conf/ssl.key/server.key"
    ErrorLog "logs/website1-error.log"
    CustomLog "logs/website1-access.log" common
	<Directory "D:/DEV-WORKSPACE/XAMPP/htdocs/website1">
		AllowOverride All
		Order allow,deny
		Allow from all
	</Directory>
</VirtualHost>
VirtualHosts Config for PROJECT 2 – website2
##VIRTUAL HOST HTTP CONFIG FOR PROJECT 2 - website2 http
<VirtualHost website2:8081>
    ServerAdmin webmaster@website2.com
    DocumentRoot "D:/DEV-WORKSPACE/XAMPP/htdocs/website2"
    ServerName website2
	ServerAlias www.website2
    ErrorLog "logs/website1-error.log"
    CustomLog "logs/website1-access.log" common
	<Directory "D:/DEV-WORKSPACE/XAMPP/htdocs/website2">
		AllowOverride All
		Order allow,deny
		Allow from all
	</Directory>
</VirtualHost>


##VIRTUAL HOST HTTPS CONFIG FOR PROJECT 2 - website2 https
<VirtualHost website2:8082>
    ServerAdmin webmaster@website2.com
    DocumentRoot "D:/DEV-WORKSPACE/XAMPP/htdocs/website2"
    ServerName website2
	ServerAlias www.website2
	SSLEngine On
	SSLCertificateFile "D:/DEV-WORKSPACE/XAMPP/apache/conf/ssl.crt/server.crt"
	SSLCertificateKeyFile "D:/DEV-WORKSPACE/XAMPP/apache/conf/ssl.key/server.key"
    ErrorLog "logs/website1-error.log"
    CustomLog "logs/website1-access.log" common
	<Directory "D:/DEV-WORKSPACE/XAMPP/htdocs/website1">
		AllowOverride All
		Order allow,deny
		Allow from all
	</Directory>
</VirtualHost>
6.4. Understanding Custom VirtualHost blocks
Here are the key points to understand while setting up your virtual host blocks:
- VirtualHost is used as a group of directives that will apply to a particular virtual host. In my case, I have 2 virtual host website1 and website2.
- DocumentRoot directive is used to declare a directory route that will bind to the server name.
- ServerName directive to set request URL. ServerName is used to uniquely identify a virtual host, when using name-based virtual hosts.
- ServerAlias this directive sets the alternate names for a host, for use with name-based virtual hosts. Name-based virtual hosts for the best-matching set of s are processed in the order they appear in the configuration hence the first matching ServerName or ServerAlias.
- Directory are used to enclose a group of directives that will apply only to the named directory, sub-directories of that directory, and the files within the respective directories.
- AllowOverride All is used to set allow the use to .htaccess within the current virtual host.
6.5. About HTTPS(SSL) Settings in VirtualHosts
As you can see we have created a separate virtual host configuration block per project/website. Unlike HTTP, these HTTPS blocks contain SSL-related directives.
	SSLEngine On
	SSLCertificateFile "D:/DEV-WORKSPACE/XAMPP/apache/conf/ssl.crt/server.crt"
	SSLCertificateKeyFile "D:/DEV-WORKSPACE/XAMPP/apache/conf/ssl.key/server.key"
In an ideal world, you would explicitly generate SSL certificate and key for your server and assign it to your relevant Virtual Hosts. But SSL cert and key generation are out of scope of this article and we shall cover it in a separate article.
However, the Apache server by default ships out a sample (sort of demo) SSL certificate and key which can be used in a lab environment. In this example, we have used the Apache supplied SSL certificate and key.
You can find these certs and keys at the following location:
XAMPP/apache/conf/ssl.crt/server.crt"
XAMPP/apache/conf/ssl.key/server.key"
7. Configure and Save VirtualHost Conf file
Now simply copy all the Virtual Host blocks prepared above into your Virtual Host Config file (httpd-vhosts.conf) and save the file and restart the Apache Server services. Your virtual host file should look like this –
# Virtual Hosts
#
# Required modules: mod_log_config

# If you want to maintain multiple domains/hostnames on your
# machine you can setup VirtualHost containers for them. Most configurations
# use only name-based virtual hosts so the server doesn't need to worry about
# IP addresses. This is indicated by the asterisks in the directives below.
#
# Please see the documentation at
# <URL:http://httpd.apache.org/docs/2.4/vhosts/>
# for further details before you try to setup virtual hosts.
#
# You may use the command line option '-S' to verify your virtual host
# configuration.

#
# Use name-based virtual hosting.
#
##NameVirtualHost *:80
NameVirtualHost *:8081
#
# VirtualHost example:
# Almost any Apache directive may go into a VirtualHost container.
# The first VirtualHost section is used for all requests that do not
# match a ##ServerName or ##ServerAlias in any <VirtualHost> block.
#
##<VirtualHost *:80>
    ##ServerAdmin webmaster@dummy-host.example.com
    ##DocumentRoot "D:/DEV-WORKSPACE/XAMPP/htdocs/dummy-host.example.com"
    ##ServerName dummy-host.example.com
    ##ServerAlias www.dummy-host.example.com
    ##ErrorLog "logs/dummy-host.example.com-error.log"
    ##CustomLog "logs/dummy-host.example.com-access.log" common
##</VirtualHost>

##<VirtualHost *:80>
    ##ServerAdmin webmaster@dummy-host2.example.com
    ##DocumentRoot "D:/DEV-WORKSPACE/XAMPP/htdocs/dummy-host2.example.com"
    ##ServerName dummy-host2.example.com
    ##ErrorLog "logs/dummy-host2.example.com-error.log"
    ##CustomLog "logs/dummy-host2.example.com-access.log" common
##</VirtualHost>


## FALLBACK VIRTUAL HOST CONFIG FOR UNMATCHED HTTP/S REQUESTS

<VirtualHost *:8081>
 DocumentRoot "D:/DEV-WORKSPACE/XAMPP/htdocs"
 ServerName localhost
</VirtualHost>

<VirtualHost *:8082>
 DocumentRoot "D:/DEV-WORKSPACE/XAMPP/htdocs"
 ServerName localhost
 SSLEngine On
 SSLCertificateFile "D:/DEV-WORKSPACE/XAMPP/apache/conf/ssl.crt/server.crt"
 SSLCertificateKeyFile "D:/DEV-WORKSPACE/XAMPP/apache/conf/ssl.key/server.key"
</VirtualHost>


## VIRTUAL HOST HTTP CONFIG FOR PROJECT 1 - website1 http

<VirtualHost website1:8081>
    ServerAdmin webmaster@website1.com
    DocumentRoot "D:/DEV-WORKSPACE/XAMPP/htdocs/website1"
    ServerName website1
	ServerAlias www.website1
    ErrorLog "logs/website1-error.log"
    CustomLog "logs/website1-access.log" common
	<Directory "D:/DEV-WORKSPACE/XAMPP/htdocs/website1">
		AllowOverride All
		Order allow,deny
		Allow from all
	</Directory>
</VirtualHost>

##VIRTUAL HOST HTTPS CONFIG FOR PROJECT 1 - website1 https

<VirtualHost website1:8082>
    ServerAdmin webmaster@website1.com
    DocumentRoot "D:/DEV-WORKSPACE/XAMPP/htdocs/website1"
    ServerName website1
	ServerAlias www.website1
	SSLEngine On
	SSLCertificateFile "D:/DEV-WORKSPACE/XAMPP/apache/conf/ssl.crt/server.crt"
	SSLCertificateKeyFile "D:/DEV-WORKSPACE/XAMPP/apache/conf/ssl.key/server.key"
    ErrorLog "logs/website1-error.log"
    CustomLog "logs/website1-access.log" common
	<Directory "D:/DEV-WORKSPACE/XAMPP/htdocs/website1">
		AllowOverride All
		Order allow,deny
		Allow from all
	</Directory>
</VirtualHost>

##VIRTUAL HOST HTTP CONFIG FOR PROJECT 2 - website2 http

<VirtualHost website2:8081>
    ServerAdmin webmaster@website2.com
    DocumentRoot "D:/DEV-WORKSPACE/XAMPP/htdocs/website2"
    ServerName website2
	ServerAlias www.website2
    ErrorLog "logs/website1-error.log"
    CustomLog "logs/website1-access.log" common
	<Directory "D:/DEV-WORKSPACE/XAMPP/htdocs/website2">
		AllowOverride All
		Order allow,deny
		Allow from all
	</Directory>
</VirtualHost>

##VIRTUAL HOST HTTPS CONFIG FOR PROJECT 2 - website2 https

<VirtualHost website2:8082>
    ServerAdmin webmaster@website2.com
    DocumentRoot "D:/DEV-WORKSPACE/XAMPP/htdocs/website2"
    ServerName website2
	ServerAlias www.website2
	SSLEngine On
	SSLCertificateFile "D:/DEV-WORKSPACE/XAMPP/apache/conf/ssl.crt/server.crt"
	SSLCertificateKeyFile "D:/DEV-WORKSPACE/XAMPP/apache/conf/ssl.key/server.key"
    ErrorLog "logs/website1-error.log"
    CustomLog "logs/website1-access.log" common
	<Directory "D:/DEV-WORKSPACE/XAMPP/htdocs/website1">
		AllowOverride All
		Order allow,deny
		Allow from all
	</Directory>
</VirtualHost>
8. Update your Window Host File
Since this is a local webserver lab environment, we need someone to do the DNS resolution for us. That’s where we will use the localhost DNS table to translate or route our Virtual Host URL to correct server. Hence you need to update your window hosts file
Navigate to ‘C:\Windows\System32\drivers\etc\hosts’ and edit your host file by adding your virtual hosts name and IP which is the loopback IP. In my case I would add the following lines to my host file –
127.0.0.1 localhost
127.0.0.1 website1
127.0.0.1 website2
Save and close the file and its done!
9. Test Your VirtualHosts
9.1. Testing the HTTP VirtualHosts
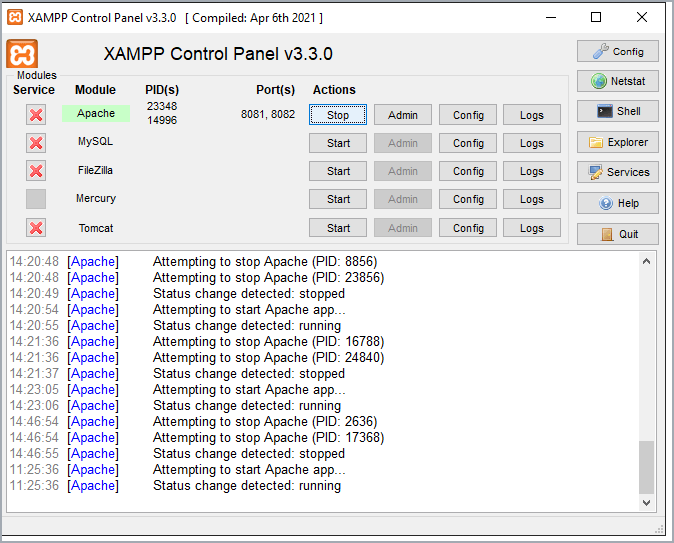
From the XAMPP Control Panel, start your Apache Server

Launch the browser and type in the URL for your first virtual host (In my case this is – http://website1:8081/)
You should see the following. As evident our virtual host configuration has worked!


Now let’s try our second virtual host which in my case is – http://website2:8081/


9.2. Testing the HTTPS VirtualHosts
When you test your HTTPS Virtual Host (https://website1:8082/).
You would see some warning by the browser since the SSL certificate we are using is not valid. But this is expected since we are using a sort of dummy SSL certificate not the real world. You can simply ask your browser to ignore it and proceed to the website. Alternatively, you can add these certificates to your local browser to get past these errors.

