
Table of Contents
In this tutorial, we will discuss how to use mouse click events and keyboard events with Selenium WebDriver. The mouse click and keyboard events are used to automate the interactions of a user with a mouse and keyboard.
Action & Actions
We encourage the use of Action and Actions together with the keyboard and mouse events. Action & Actions are user-facing APIs for emulating complex user gestures.
Action is an interface that represents a single user interaction task. Generally,build() method generates a composite action by containing all the actions. On the other hand, Actions implement the builder pattern and it builds a Composite Action that contains all actions specified by method calls.
A Sample Program
Let’s write a simple program explaining these concepts in detail. I’ll select the Facebook website as an example to describe both keyboard and mouse events.
Mouse click event will be triggered when we click the username field. Next, keyboard events will occur when we type the username and password in username and password fields. Again mouseclick event will be used to click on the “Login” button so that we can complete the Facebook login action.
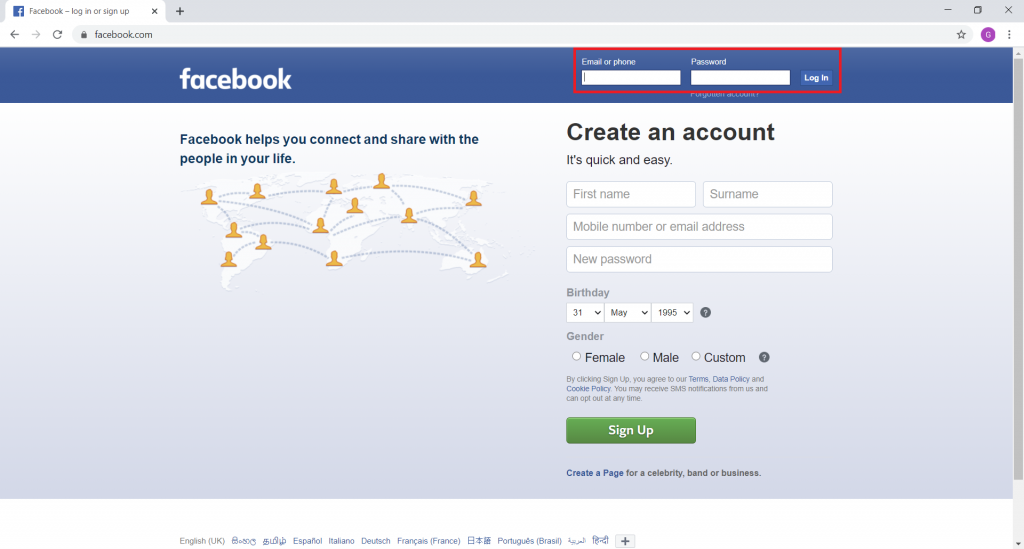
The following image identifies the HTML elements that holds username, password, and log in button.

Accordingly, we can point to all three fields using the ID attribute. Now let’s open the Eclipse IDE and create a new class and name it as Facebook.

Let’s import the libraries.
import org.openqa.selenium.By;
import org.openqa.selenium.Keys;
import org.openqa.selenium.WebDriver;
import org.openqa.selenium.WebElement;
import org.openqa.selenium.chrome.ChromeDriver;
import org.openqa.selenium.interactions.Action;
import org.openqa.selenium.interactions.Actions;
As usual, set the system property to the location of Chrome WebDriver and instantiate a WebDriver element from org.openqa.selenium.
System.setProperty("webdriver.chrome.driver", "D:\\Chromedriver\\chromedriver.exe");
WebDriver driver=new ChromeDriver();
Let’s assign the URL for Facebook to the WebDriver element.
driver.get("https://www.facebook.com/");Next, we will create three new web elements that point to the username, password, and login locations using their IDs.
WebElement username = driver.findElement(By.id("email"));
WebElement password = driver.findElement(By.id("pass"));
WebElement loginButton = driver.findElement(By.id("loginbutton"));
Now, let’s move on to implementing the Action & Actions. We will create a variable called builder from the Actions class. We will use builder to build a composite action that will contain all actions from the method call.
Furthermore, we will create a variable called mouseOver from the Action interface which needs to be used later to run the actions using the build() method.
Actions builder = new Actions(driver);
Action mouseOver = builder
	.moveToElement(username)
	.click()
	.sendKeys(username, "[email protected]")
	.sendKeys(username, Keys.TAB)
	.sendKeys(password, "This is my Password")
	.build();
According to the code above, the moveToElement method will go to the element where the ID is “email” (username box). Later, it will perform the click mouse event so that you can type the username.
Using the sendKeys keyboard event, we will parse the email as a username. Now let’s move to the password box. You can simply achieve this by pressing the tab key from the username box. We will use the same concept here as well. Using the sendKeys keyboard event, we will press the TAB button so that it moves to the next box.
Finally, we will type the password using the sendKeys keyboard event and compile all the actions with the build() method.
We can use the perform() methods to perform the actions which are mentioned below :
mouseOver.perform(); Type username and password into the necessary places then we need to click on the login button in order to complete the task. Once again, we will use the mouse click event for the loginButton variable.
loginButton.click();This method will simply find the ID ‘login button’. Click on top of it. You will see the next logged-in session on the Facebook site, after giving the correct username and password. Confirm the login By pressing the Login button and we can print the current URL of the page after the successful login.
System.out.println(driver.getCurrentUrl());That’s all with the demonstration. The entire program is as follows:
package myPackage;
import org.openqa.selenium.By;
import org.openqa.selenium.Keys;
import org.openqa.selenium.WebDriver;
import org.openqa.selenium.WebElement;
import org.openqa.selenium.chrome.ChromeDriver;
import org.openqa.selenium.interactions.Action;
import org.openqa.selenium.interactions.Actions;
public class Facebook {
public static void main(String[] args) {
         		System.setProperty("webdriver.chrome.driver", "D:\\chromedriver_win32\\chromedriver.exe");
		WebDriver driver = new ChromeDriver();
   		driver.get("https://www.facebook.com/");
         		WebElement username = driver.findElement(By.id("email"));
		WebElement password = driver.findElement(By.id("pass"));
		WebElement loginButton = driver.findElement(By.id("loginbutton"));
         		Actions builder = new Actions(driver);
         		Action mouseOver = builder
			.moveToElement(username)
			.click()
			.sendKeys(username, "This is my Username")
			.sendKeys(username, Keys.TAB)
			.sendKeys(password, "This is my Password")
			.build();
         		mouseOver.perform();
         	         	loginButton.click();
         		System.out.println(driver.getCurrentUrl());
   	}
}
Conclusion
We hope this article helps to understand how mouse and keyboard events work. We hope you apply the same concepts to other webpages and come up with new ideas to automate the keyboard and mouse events with Selenium WebDriver.


