
Table of Contents
- 1. What is TestNG?
- 2. Why use TestNG with Selenium?
- 3. Installation of TestNG
- 4. Setting up a TestNG Project
- 5. Creating a TestNG TestFile
- 6. Run Test Case and Generate Report
- 7. Asserts in TestNG
- 8. Summary
1. What is TestNG?
TestNG is an open-source automated testing framework with flexible and powerful features. It is inspired by JUnit and NUnit but with some additional advantages and functionalities. TestNG gives the developers to build tests with easy annotations, sequencing, grouping, and parameterizing.
The ability to generate test reports to get an idea on what test cases passed, failed, and skipped makes it even stronger and a better choice for a test automation framework.
2. Why use TestNG with Selenium?
Selenium does not come with test report generating options. The best thing we can do is printing the results to the console. But with TestNG, we can produce test results in a proper report format through which we can get an overall idea for better analysis. Besides this, there are many other additional advantages TestNG provides.
- Produces test reports in different formats with clear ides of what test passed, failed, and skipped.
- The same test cases can be executed several times by just using a keyword.
- Test cases can be prioritized and grouped and converted to a .xml file.
- Test cases can be run in multiple browsers simultaneously.
- Ability to integrate with tools like Maven and Jenkins.
- Supports parallel testing and load testing.
- Easy and understandable annotations like ‘@’
- It provides the ability to parameterize data.
3. Installation of TestNG
Installing TestNG to Eclipse is pretty easy since it comes as a plugin obtained from Eclipse Marketplace.
- First, Eclipse IDE should be installed on your computer, and it can be downloaded from their website.
- Next, launch Eclipse and go to Help in the menubar and select Eclipse Marketplace.
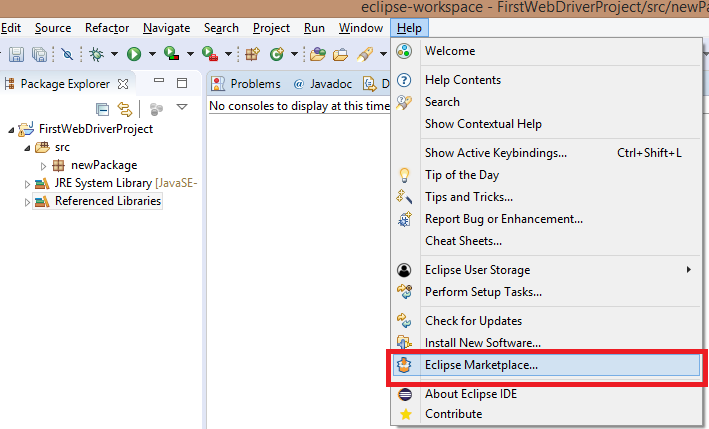
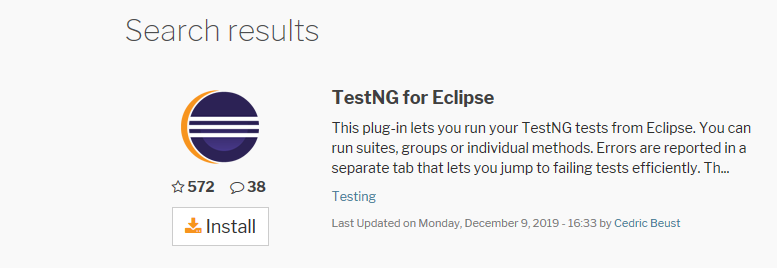
- Once it is clicked, the Eclipse Marketplace Modal will be displayed. Then you will have to type in “TestNG” and search for it. Once the result comes up, click Install.
4. Setting up a TestNG Project
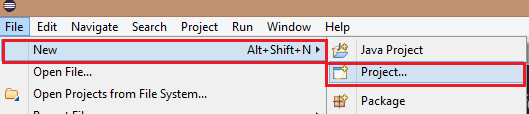
- Once it is installed, we can create a new Java project by clicking File > New> Project
- Give the name “myTestNGProject” and click Finish

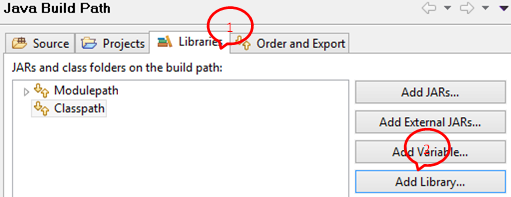
- Next is to import the libraries into the project. Go to project properties > Java Build Path
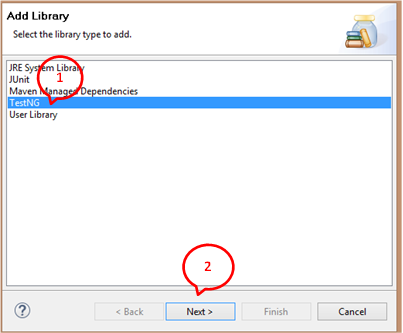
- Under libraries tab select Add Libraries.
- Then select TestNG and click Next, then Finish.
- Next, add the Selenium jar files into the project the same way as above but select ‘Add External Jars’ under the library tab, and select the .lib files from the folder they are saved at. These library files can be downloaded here.
5. Creating a TestNG TestFile
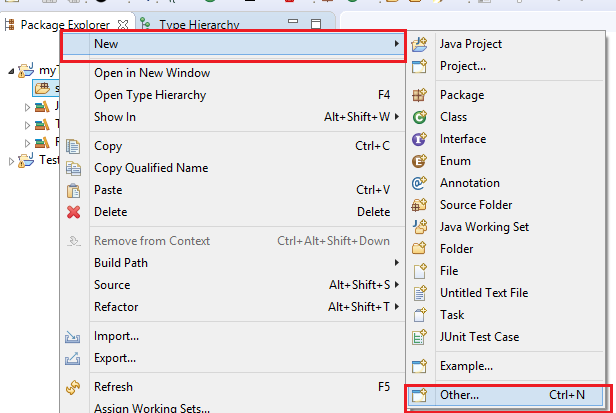
- Right-click on the “src” file of the project created earlier and select New >Other
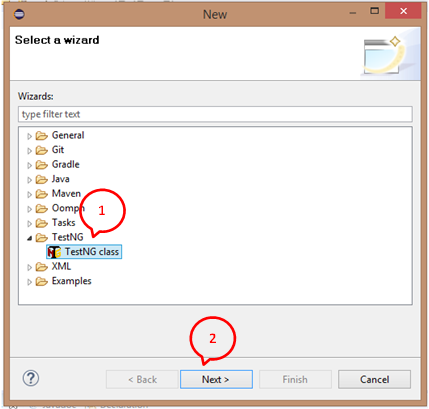
- Select the TestNG class under the TestNG folder and click Next.
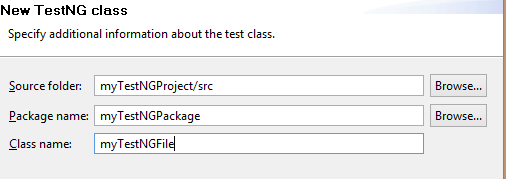
- Type in the following values in text boxes given and click Finish.
- Once it is done, a default template can be seen in our class created by TestNG
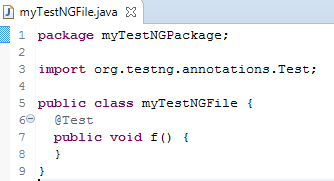
- To create a test case, the following code will be used. The code below will fetch the site https://www.airbnb.com/, verify the title, print out the result, and close the browser.
package myTestNGPackage;

import org.testng.annotations.Test;
import org.openqa.selenium.WebDriver;
import org.openqa.selenium.firefox.FirefoxDriver;
import org.testng.Assert;

public class myTestNGFile {

  public String baseUrl = "https://www.airbnb.com/";
  String driverPath = "C:\\geckodriver\\geckodriver.exe";
  public WebDriver driver ;
  @Test
  public void f() {

     System.out.println("launching firefox browser");
      System.setProperty("webdriver.gecko.driver", driverPath);
      driver = new FirefoxDriver();
      driver.get(baseUrl);
      String expectedTitle = "Vacation Rentals, Homes, Experiences & Places - Airbnb";
      String actualTitle = driver.getTitle();
      Assert.assertEquals(actualTitle, expectedTitle);
      driver.close();
  }
}
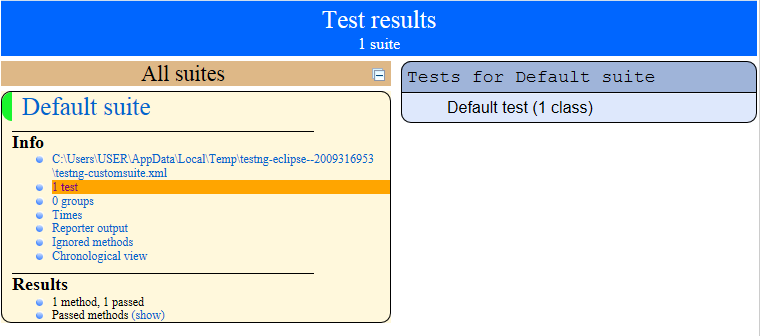
6. Run Test Case and Generate Report
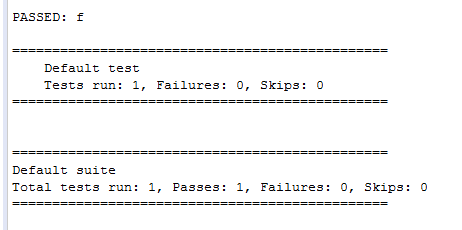
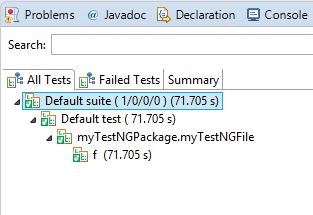
Tests can be run the usual way we run a test in Eclipse, but there will be 2 reports. One in the console, which is text-based, and the other in the TestNG result window, which is graphical.
To create HTML reports, right-click on the project, and click Refresh. Then you can see a new folder called “test-output”. Expand it and view the files. There will be a file called index.html. Double click on it to view the report.
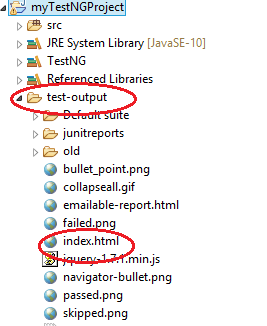
The report will open up in the default browser of Eclipse. It is a detailed view of the tests executed, their information, and test results.
7. Asserts in TestNG
Assertions are used to validate test scripts and show whether they have passed or failed. In the above example, we have used Assert.assertEqual(actual value, expected value). If the values do not match the assert with a throw, an exception and the test case will fail.
There are mainly two types of Assertions. One is Hard Assertions, which are default in TestNG and are used to stop a test immediately when an assertion fails. The second one is Soft Assertion, which is a custom assertion that is used when a test has to continue even when an assertion fails in the sequence.
8. Summary
- TestNG is powerful and a flexible testing framework.
- It is inspired by JUnit and NUnit but has better functionalities.
- Using TestNG with Selenium provides many great advantages, including the ability to produce test reports with better visibility of what test cases passed, failed, or skipped.
- To use TestNG in Selenium, we need to create a TestNG class and write the test script on it.
- We use Assertions to verify the status of the test in the middle of the test run.
- Once a test script runs in TestNG, it produces two outputs. One in the console and the other in the TestNG result window.
- After running the test suite, we can obtain the test report in the form of a .html file.


