How To Create Maven Project in Eclipse With Archetype

Getting started with Apache Maven in Eclipse

Maven Basics

Maven automates the steps involved in building a software application like adding the JAR files, compiling code, running unit tests, creating the output jar/war file, etc. This makes the code less error-prone. Maven uses an XML configuration file known as the POM file. Developers need to specify information like the JAR files required by an application, the type of output artifact (jar,war, etc). Maven then uses the instructions in the POM file to build the application.

Eclipse Maven Integration

Most of the recent Eclipse releases already include Maven. So, developers do not need to do anything special to install Maven in Eclipse.  However, some earlier versions of Eclipse do not include Maven, so it needs to be installed explicitly from the Eclipse marketplace. Once Maven is set up with Eclipse, it allows you to easily create a Maven project and use all the Maven features like dependency resolution within Eclipse itself.

Create Maven Project with Archetype in Eclipse

Maven archetype provides a template that can be used to create a particular type of Maven project. If a Maven project is created with an archetype selection, Maven creates the POM file accordingly. Some of the common Maven archetypes are as follows:

  • maven-archetype-quickstart – Can be used to create a basic Maven project
  • maven-archetype-j2ee-simple – Can be used to create a simple j2ee project
  • maven-archetype-webapp – Can be used to create a web application

In order to create a Maven project with a webapp archetype, the following steps need to be followed:

1
Create new artefact of type ‘Other’

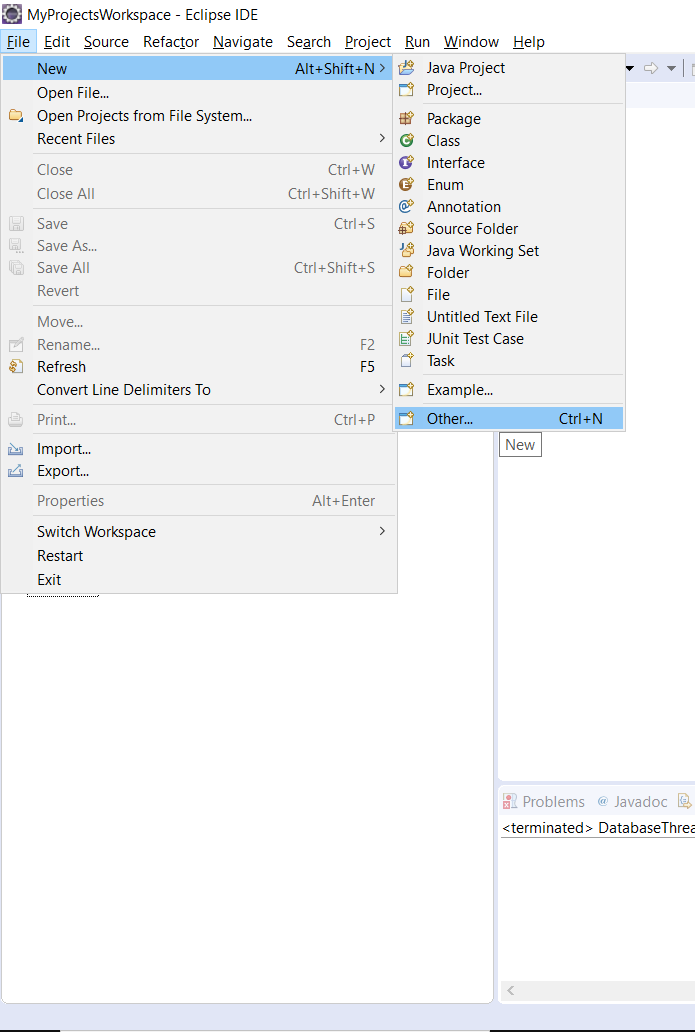
On Eclipse main menu, navigate to ‘File > New’ and select ‘Other’

2
Select Maven Project

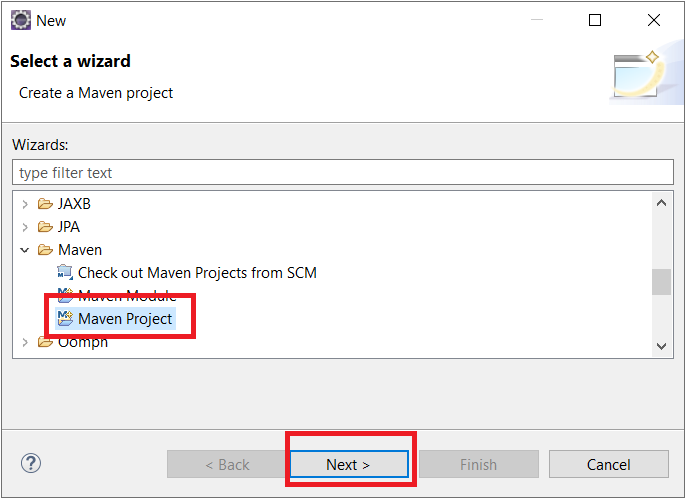
Select the option ‘Maven Project’ and click Next.

3
Uncheck ‘Create Simple Project

Leave the Create a Simple Project (skip archetype selection) checkbox unchecked. Click Next

4
Use filter ‘maven-archetype-webapp

5
Select maven-archetype-webapp.

6
Input Group Id and Artifact Id

Enter a value for Group Id and Artifact Id. Change version and package if required. Click Finish

7
Verify New Maven project in Eclipse

This creates a Maven project in Eclipse with the Maven directory structure and POM file as follows

8
Finish!

Finish! This POM file can then be modified by adding dependencies and other information as required.


Tushar Sharma
Tushar Sharmahttps://www.automationdojos.com
Hi! This is Tushar, the author of 'Automation Dojos'. A passionate IT professional with a big appetite for learning, I enjoy technical content creation and curation. Hope you are having a good time! Don't forget to subscribe and stay in touch. Wishing you happy learning!

LEAVE A REPLY

Please enter your comment!
Please enter your name here

This site uses Akismet to reduce spam. Learn how your comment data is processed.

Recent Posts

RELATED POSTS

Java Tutorial #6 – Jump Statements

Introduction The break statement is used to stop further execution. It can be used either in a loop or within a switch statement. Break Statement The break...

How To Sort List in Java

Introduction A List is an interface in the Java collection framework. It can be used to store objects. Programmers often encounter scenarios where they need...

Maven CLI Options and Switches Reference

Maven offers a good set of commands and CLI Options to carry out wide range of Dev tasks. Most of these commands are in...

Convert List to Array Using ToArray Without Param

Java provides a toArray method on the 'List' interface. This can be used to convert a 'List' to an array. Since there are are...

Â

RECENT 'HOW-TO'

How To Install Oh-My-Posh On Windows PowerShell

Oh-My-Posh is a powerful custom prompt engine for any shell that has the ability to adjust the prompt string with a function or variable. It does not...

MORE ON CODEX

FEATURED PROJECTS

Windows JDK Manager (win-jdk-Manager)

ADjo LABS PROJECT : Simple and lightweight desktop utility with Interactive cmd Interface for easy view, re-point and switching between JAVA versions on windows. Demonstrating the capability...

MORE IN THIS CATEGORY

Java Tutorial #5 – Loop Statements

Iteration statements are used to repeat a particular block of code until a certain condition is true. In this article, we will be taking...

Concatenate Strings Using String.join()

Java 8 has added a static join method to the String class. This concatenates Strings using a delimiter. Performance wise, it is similar to...

Concatenate Strings Using String.join() for Collections

There is an overloaded version of the String.join method that accepts as parameter an Iterable implementation. Since all Collection classes implement the Iterable interface,...

Convert List to Array Using ToArray With Param

There is an overloaded version of the toArray method. This accepts an array as a parameter and returns a result array that is of the same...

CHECKOUT TUTORIALS

Working with Selenium WebElements

Table of Contents 1. Selenium WebElements 2. WebElement Locators 3. Working With Text Box 4. Working With Buttons 5. Checkboxes and Radio Buttons 6....

Working with JMeter Listeners

- Advertisement -spot_img